Showing posts with label distress. Show all posts

Friday

Gloria

Yep, she's big


and she's chunky


and even her curves have curves

(this is a Madagascar 2 reference of course)

This chest is by far the most distressed piece I've ever done.

After spraying everything in sight with my HLVP paint gun, I thought it might be fun to hand paint again (just to make sure I remembered how)


A little ASCP, clear wax, distressing, dark wax and buffing.


Chunky!  (and someone else must've loved her chippy, chunkiness, too - she was the first thing to sell in the July sale at Hello, Sailor! Yay!)


Linking up here:
Piece of Work Wednesday at Primitive and Proper 
Furniture Feature Friday at Miss Mustard Seed 
What Have You Redone? at Redoux 


Monday

White

White hat = good guys, right?  White flag = I surrender!  White dress shirt on 5 year old boy = um, NO! 

"Dark walnut stain, then butter yellow paint, then black paint, then dark stain.  Can I be WHITE 
this time around?" she asked.  
 "Of course." I replied.


What, you don't talk to your furniture?  Then how do you know what it wants to become?  
See, it's NOT about me and I know it, mmmmmkay?

Now, when you partially disassemble and then reassemble a large and fairly detailed piece of furniture there is at least a one important thing you should know:
No matter how perfectly the exterior cabinet looks and that perfection is subsequently confirmed by various levels and measuring devices (is plumbness even a word?) please be aware that the drawers will NOT fit back in said "repaired" cabinet.  (carpentry 101?)


And, you'll have to find a disguise for your poor buffet.
Now, maybe this should have been obvious, but, as you may know, I am an optimist and was very sure that by repairing the cabinet, all would be well with the world.
(Also, I blame anyone I ever knew from the time I was 12 until I graduated from high school for 
not making me take a wood shop class.)

So, it was back to square (or not so square as it were) one.

We discussed my good intentions and the fact that I would not surrender.


And we both agreed we could happily live with a few imperfections.  No surrender necessary.


Linking to these fun parties:
Piece of Work Wednesday at Primitive & Proper 
Monday's Party at Three Mango Seeds 
Power of Paint Party at Domestically Speaking
Furniture Feature Friday at Miss Mustard Seed
What Have You Redone? at Redoux
Saturday Night Special at Funky Junk Interiors
Restored It Wednesday at Restore Interiors


Tuesday

Buffet Beautification!!


{Hi!  Thanks for stopping by!  Please take a second to subscribe if you haven't already.  I also have a Facebook page and Pinterest Boards so that you can keep up with all the fun!! I love your feedback, so leave a comment and let me know you were here!  Thanks - L} 


There is no formal dining room in our home.  Well, the room itself exists, it's just been repurposed.  Hubby and I decided a few years ago that a "lounge" was in order.
(Can't you hear the music and see us dancing cheek-to-cheek in the low lighting?  Yep, that's a joke).
Since the formal dining room had been used all of twice in 3 years, it was an easy decision.  We sold our nice dining room table, chairs and buffet on Craigslist. (ugh, what were we thinking?), put in a gorgeous bar, some comfy chairs and added some animal print, and vintage bar accessories.

The "jungle room" has been a place where serious and silly conversations have taken place and more than a few party pics have been snapped.  But mostly it's a place where you can relax and laugh and just BE, with no television or video games.  As a family, it worked for us.  I say "worked" because I've recently taken over the space as my place to stack furniture and other unfinished projects to the ceiling office.

My reason for telling you this is that I have no reason to own a buffet/sideboard.  There is no space for one, no need for one, and yet, when I saw this one I knew I wanted to give it a new life (for someone)!


The wood was solid, and the legs and curves were nice.  The backsplash was missing and it had some veneer damage, but it was minimal and you know I love a challenge!
I recruited routing help to give her a little tiara.  Thanks Dad!


I also considered new hardware, since the tarnished grey stuff wasn't doin' it for me, but then I remembered the greatest of all "de-gunkers" - Diet Coke.  After a quick soaking, they were back to their original beauty... and WOOO, they were bright and brassy!

This is after 2 coats of paint, with no distressing or topcoat.
(I was just giving that hardware a test-drive)


I distressed, glazed, dry brushed, and then sealed; some of which was overkill.  After trying about 5 different sets, I decided that the original pulls were what I liked, just not in their bright, brassy state.  So, rather than buying new and after all that de-gunking, I ended up painting them lightly with Rustoleum Hammered Brown.
(I know - "make up your mind, woman!")

In all her glory...


I'm very happy with the transformation!


  Pin It


My makeover was featured here!  (Yay!)
Photobucket 


This is one of my "befores", remember these?
Shine Your Light

Also linking up here:
Photobucket Photobucket Photobucket Furniture Feature Fridays Redoux Funky Junk Interiors
One Project Closer

Wordle Work - More fun with Subway Art!

As you can probably imagine, I gave a very personal piece of Subway Art as a Christmas present to one of my family members.  I used a little different technique to create this one and I thought I'd share it here.


 My son's second-grade teacher introduced me to a website called Wordle and I think it's a really fun way to create!  It's basically a free "word image" generator created by some smarty-pants at IBM.  The possibilities are endless - you can decide on color, font, capitalization and make your words horizontal or vertical only or mostly... the list of options goes on and on.

Example: New Year's Resolution, by Anonymous
Source: Wordle

The frequency that you enter each word determines the words size.  In my example (at the top of the page) I wanted Dennis and Jennifer to be the largest words, so I put them in about 15 times each.  Then for the next size down I'd pasted the names 11 times each and so on. I found it helpful to just make tick marks to count and did a lot of copying and pasting.  In the example above, the author clearly used each word the same number of times.

Once you've decided on the font, color, sizes, etc, you can continue to "randomize" the words and until it forms a shape or is in the order that you like.

Here's another example I found today:
Source: Wordle Anonymous

Once you have your design the way you want it, take a screen shot (on my laptop it's function and print screen) and use "paint" or another similar program to save it to, then crop it in Picasa or other editing program.  Based on some copyright issues, you can't just save the document.
It's probably a good idea to read the FAQ's before you get started, just in case.

Then I uploaded my image to the Staples print center.  The print that was large enough to work with a 25 x 30 canvas cost $2.12 (cheap!).  From there I just adhered it to the canvas and glazed and distressed in the typical fashion.  
For the full tutorial on this, click HERE.

Another anonymous example:


Source: Wordle Anonymous

One word of caution: the gallery is public.  So, for example, when I made my nephew's birth sign, I took a screen shot once it was done but chose NOT to save it to the gallery.  The whole world didn't need to know his stats!!

I think all of these would make unique, personal art!  So, go to www.wordle.net and play around then come back and let me know what you've come up with!!

Linking this idea up here:
HookingupwithHoHshabby creek cottage

Sunday

Furniture Love - Girlie Rose Back Chairs


As much as I enjoy being crafty, I realize that I love furniture transformations far more! 

Crafty Cork letter

Crafty Diaper Cake (circa 2007, I thought it was pretty cute back then!)


Mirror before and after
 
SO, I took advantage of some mild weather this weekend to get moving on a few pieces of furniture that have been waiting patiently.
These rose back chairs were inexpensive Craigslist finds, but they were pretty and had potential!


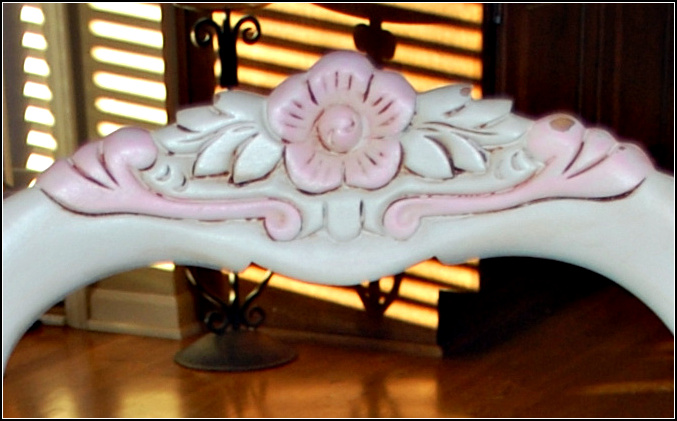
The roses and curvy legs are so feminine, they just were screaming for some pink!


I started off by reupholstering the seats with canvas drop-cloth.  (Yes, I said it, a drop cloth!  It's canvas, it's pretty, it's easy to work with and softer than burlap.  Do NOT share this secret, or the guys at the orange store will just start charging more for it!)
I found this original needlepoint rose fabric under the top layer.


After reupholstering, I added a little color with fabric paint and a stencil.


I brewed up a little homemade chalk paint using the following recipe:
1 1/2 Cups latex paint
1/2 Cup water
1/2 Cup calcium carbonate (ordered online - it's just powdered chalk)
I used an old pasta sauce jar and shook it up really well.  This is the perfect way to paint furniture if you plan to distress it at all.  It covers everything, doesn't require priming and dries really fast!!

Thanks to Sherry at No Minimalist Here for the recipe!

Just for good measure, I used two coats of white paint and then painted the roses with pink craft paint.  The pink originally felt too bright, so I watered down a bit more of the white chalk paint (making it really milky) and painted over the roses.


Once the paint was dry, I distressed lightly, and glazed with Valspar Mocha glaze.  I love the way the carved details stand out!

Notice the little distress mark on the left side?  This same mark is on both chairs.  I think it must be where the chairs were pushed into the table over and over in their former life.  Can you picture it?  Sorry to get sappy, but something about making that connection just fills me up.


Voila!


I'm really pleased with these!  They seem perfect for a girls' room (which doesn't exist in my home!)  What do you think of the transformation?

One more before and after...


I was featured here!!!!!

Photobucket

These pretty girls are partying here:

Home Stories A2ZPhotobucketCreative Kristi DesignsPhotobucketMy Repurposed LifeWith A Shot Of BrandyRedouxThe Shabby NestFunky Junk's Saturday Nite Special

LinkWithin

Related Posts Plugin for WordPress, Blogger...