Showing posts with label mirror. Show all posts

Friday

Powder Room Reveal


Calling this project a "Powder Room Makeover" sounds WAY more elegant than saying
"Hey, look at my toilet!" 

I'm fancy like that.

The most used room in the house was SO boring.  Cue facelift music!!


 I scored this great mirror on Craigslist and it became the inspiration for the room.


I read up on how to remove a builder-grade mirror and even texted a few friends for advice.  Piano wire?  None handy.  Pry bar?  Nope.  Picture wire?  Too thick.  Then it hit me - what I did have available on a Friday night around 9pm, was 14 flat-head screwdrivers and a rubber mallet.  Tap, tap, cringe, tap, tap, cringe, this went on for about 30 minutes then - pop!   The whole thing came off without any bad luck involved!

 Just ignore that mess in the background.
 
 Then I repaired and repainted the walls and hung the mirror.


At this point I had one gold mirror.  I also had an oil rubbed bronze light fixture, towel ring and tp holder.  Add in chrome knobs, door handle and faucet.  Too many metals for my taste.  So I did what any perfectly sane woman would do and I got out the spray paint.


So, I painted the faucet, the doorknob, the toilet flusher and even that little chrome stopper thing-a-ma-bob at the bottom of the sink.  (I did this back in November and still not a scratch!)  Here's the process... tape well and cover everything in sight.  Turn on the vent fan.  Spray a light coat.  Run and shut the door behind you!  Repeat several times over a 24 hour period.

  
 Then one wall got some serious va-va-voom!!


I borrowed a stencil from a friend (thanks Jaylee!!) and used a gold paint pen.  Please take my advice and do this the easy way = buy gold paint and use a roller.  Your writing hand will thank you.


I'm crazy about this wall!  The way the gold reflects the light is amazing.

View from the floor (completely unnecessary in real life, by the way.)


You might remember this sneak peek.  We put adhesive-backed vinyl mustaches on the mirror for Christmas and New Years' parties!  Okay, I admit it, the mustaches are still there.


I'm still in search of a few more accessories, but I consider this small makeover a success!!
Pin It

Linking here:
Made by You Monday at Skip to My Lou
Tutorials & Tips at Home Stories A 2 Z
Craft and Tell at Cherished Bliss
Metamorphosis Monday at Between Naps on the Porch 
Weekend Warrior Mondays at Ask Anna 
Trash 2 Treasure Tuesdays at Kammy's Korner
Restored it Wednesday at Restore Interiors
Thrifty Thursday at Thrifty Decorating
Transformation Thursday at The Shabby Creek Cottage 
Strut Your Stuff at Somewhat Simple 
Crafty, Scrappy, Happy Me Thursday 
Open House Party at No Minimalist Here
Share Awesomeness at 36th Avenue
Thingamajig Thursday at Radcrafter 
Link it up Thursday at Seven Alive 
Show and Share at Vintage Gwen 
Inspired Creations at Embracing Change 
Saturday Night Special at Funky Junk Interiors 
Repurpose Remodel Reveal at The Rooster and The Hen

New Year's Eve Fun

 I'm looking forward to ringing in the New Year with my favorite people!

Vintage Mirrored Mantel


A mustache for party-goers of every height!
(bathroom makeover reveal to come)


And a festive print from Custom Printables!


May 2012 bring you much love, happiness, peace, prosperity, and good health!  

Happy New Year!

Sunday

Furniture Love - Girlie Rose Back Chairs


As much as I enjoy being crafty, I realize that I love furniture transformations far more! 

Crafty Cork letter

Crafty Diaper Cake (circa 2007, I thought it was pretty cute back then!)


Mirror before and after
 
SO, I took advantage of some mild weather this weekend to get moving on a few pieces of furniture that have been waiting patiently.
These rose back chairs were inexpensive Craigslist finds, but they were pretty and had potential!


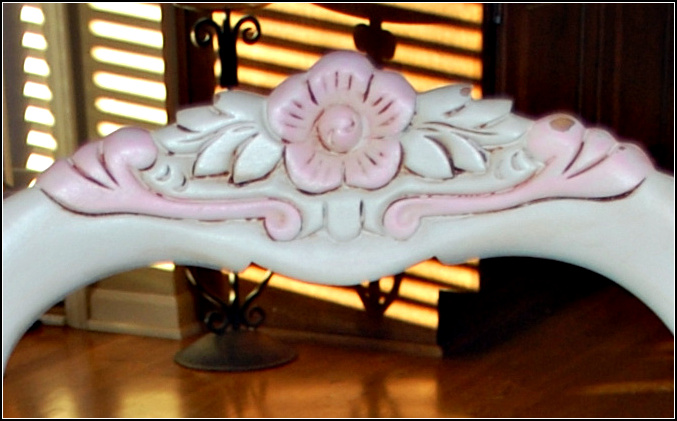
The roses and curvy legs are so feminine, they just were screaming for some pink!


I started off by reupholstering the seats with canvas drop-cloth.  (Yes, I said it, a drop cloth!  It's canvas, it's pretty, it's easy to work with and softer than burlap.  Do NOT share this secret, or the guys at the orange store will just start charging more for it!)
I found this original needlepoint rose fabric under the top layer.


After reupholstering, I added a little color with fabric paint and a stencil.


I brewed up a little homemade chalk paint using the following recipe:
1 1/2 Cups latex paint
1/2 Cup water
1/2 Cup calcium carbonate (ordered online - it's just powdered chalk)
I used an old pasta sauce jar and shook it up really well.  This is the perfect way to paint furniture if you plan to distress it at all.  It covers everything, doesn't require priming and dries really fast!!

Thanks to Sherry at No Minimalist Here for the recipe!

Just for good measure, I used two coats of white paint and then painted the roses with pink craft paint.  The pink originally felt too bright, so I watered down a bit more of the white chalk paint (making it really milky) and painted over the roses.


Once the paint was dry, I distressed lightly, and glazed with Valspar Mocha glaze.  I love the way the carved details stand out!

Notice the little distress mark on the left side?  This same mark is on both chairs.  I think it must be where the chairs were pushed into the table over and over in their former life.  Can you picture it?  Sorry to get sappy, but something about making that connection just fills me up.


Voila!


I'm really pleased with these!  They seem perfect for a girls' room (which doesn't exist in my home!)  What do you think of the transformation?

One more before and after...


I was featured here!!!!!

Photobucket

These pretty girls are partying here:

Home Stories A2ZPhotobucketCreative Kristi DesignsPhotobucketMy Repurposed LifeWith A Shot Of BrandyRedouxThe Shabby NestFunky Junk's Saturday Nite Special

LinkWithin

Related Posts Plugin for WordPress, Blogger...