{Hi! Thanks for stopping by!
Please take a second to subscribe if you haven't already. I also have a Facebook page and Pinterest Boards so that you can keep up with all the fun!! I love your feedback, so leave a comment and let me know you were here! Thanks - L}
There is no formal dining room in our home. Well, the room itself exists, it's just been repurposed. Hubby and I decided a few years ago that a "lounge" was in order.
(Can't you hear the music and see us dancing cheek-to-cheek in the low lighting? Yep, that's a joke).
Since the formal dining room had been used all of twice in 3 years, it was an easy decision. We sold our nice dining room table, chairs and buffet on Craigslist. (ugh, what were we thinking?), put in a gorgeous bar, some comfy chairs and added some animal print, and vintage bar accessories.
The "jungle room" has been a place where serious and silly conversations have taken place and more than a few party pics have been snapped. But mostly it's a place where you can relax and laugh and just BE, with no television or video games. As a family, it worked for us. I say "worked" because I've recently taken over the space as my
My reason for telling you this is that I have no reason to own a buffet/sideboard. There is no space for one, no need for one, and yet, when I saw this one I knew I wanted to give it a new life (for someone)!
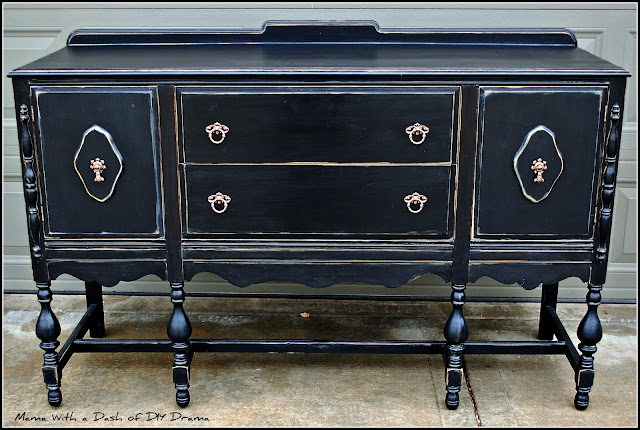
The wood was solid, and the legs and curves were nice. The backsplash was missing and it had some veneer damage, but it was minimal and you know I love a challenge!
I recruited routing help to give her a little tiara. Thanks Dad!
I also considered new hardware, since the tarnished grey stuff wasn't doin' it for me, but then I remembered the greatest of all "de-gunkers" - Diet Coke. After a quick soaking, they were back to their original beauty... and WOOO, they were bright and brassy!
This is after 2 coats of paint, with no distressing or topcoat.
(I was just giving that hardware a test-drive)
I distressed, glazed, dry brushed, and then sealed; some of which was overkill. After trying about 5 different sets, I decided that the original pulls were what I liked, just not in their bright, brassy state. So, rather than buying new and after all that de-gunking, I ended up painting them lightly with Rustoleum Hammered Brown.
(I know - "make up your mind, woman!")
In all her glory...


I agree, the hammered brown not brass pulls. It looks great. So then, no room for it, just what are you going to do with it?
ReplyDelete~Bliss~
Well, at this very moment it's sitting in my great room posing as an extra, awkward piece of furniture. One of my gf's has been eying it for some time though, so hopefully she'll have a new home soon! Thanks for visiting!! - Lori
DeleteAbsolutely gorgeous! Love, Love, Love!!!
ReplyDelete~Andi
Andi - thanks girl! It means so much that you stop by!! - L
DeleteI love it! I wish I had room for it at my house....
ReplyDeleteHolly
Holly, thanks! I know, I really had it in my head that it's be perfect as an 'entertainment center' alternative, but it's about 14" too long for my space. (Boy did I eye that wrong - ha) Thanks for stopping by! - Lori
DeleteI'm impressed, this looks fabulous!
ReplyDeleteBeth
http://alyssabeth1.blogspot.com/
Beth, thanks so much!!! - Lori
Deletebeautiful redo.
ReplyDeletewww.budgetfriendlydecorating.com
Sarah
Sarah, thanks for the kind words!! - Lori
Deleteha! i have your buffet's twin hanging in my basement! thanks for the preview of it in black!
ReplyDeleteoh, i'm so over the formal dining thang. love your idea for using the space to BE! is that where this beauty's going??
Oh, I can't wait to see what you do with it! Knowing your talent, it will be gorgeous! I don't know why I chose black - but wow was it way too serious before the distressing and such! Anyway, this one may end up at a friends' place, but we'll see! - L
DeleteIt's beautiful! I love the tiara! I have a weekness for buffets...they are just so pretty!
ReplyDeleteDanielle, thanks! I'm with ya, there's just something about a big, chunky piece that I can't resist! Thanks for visiting!! - Lori
Deleteyou mama and your drama, that is darn swell!!! good choice sticking with the original hardware and revampin' 'em a little. :)
ReplyDeleteThanks Kammy!!! - L
Deletethat is gorgeous!!! i love the distressed black on this piece- it's drama! :)
ReplyDeleteCassie, thanks for the kind words!! - Lori
DeleteYour buffet looks gorgeous in her new outfit! great job Lori!
ReplyDeletegail
Thanks Gail!!! - Lori
DeleteThis is truly a beautiful piece....I would love this in my home. Great job Lori! You're amazing.
ReplyDeleteThanks Lisa!!! - Lori
DeleteYou definitely have vision and a way with paint! Absolutely beautiful!!
ReplyDeletePam, thanks so much!!
DeleteWhat a difference a can of paint makes. Stunning makeover. Thanks for sharing.
ReplyDeleteMaggie, thanks so much!! And yes, what on earth would we do without paint!! - Lori
DeleteTurned out great! Thanks for sharing this beautiful piece! I am your newest follower, please stop by and say hi sometime. Tabitha @ simplyhomecents.blogspot.com
ReplyDeleteTabitha, thanks so much!! I'm visiting now! - Lori
DeleteLove this buffet! Nice job! I'm a new blogger (and your newest follower). How'd you get your buttons to line up in a nice, neat row??? That has been aggravating the life out of me! Cyndi
ReplyDeleteCyndi, thanks!!! I am sending you an email right now!! - Lori
DeleteBeautiful piece and it turned out great.
ReplyDeletePam, thanks so much! ~Lori
DeleteSimply beautiful!!!
ReplyDeleteThanks, it was a labor of love!! ~Lori
DeleteThis comment has been removed by a blog administrator.
ReplyDeleteThis is gorgeous! I have a question though, how did you fix the missing veneer? wood putty or did you just take the veneer off? If you took it off, how did you get it off? i have a desk in similar condition. I was just thinking of taking the veneer but not sure of the best way to get it off. I sooooo look forward to your emails~~~Thanks for sharing all your pretties.
ReplyDeleteThank you! On the places where the veneer was badly damaged, or mostly missing, I did remove it. I used a small putting knife, a rubber mallet. On a couple of tough spots, I did use my hair dryer to loosen the glue. Several of the spots I filled in with wood putty and sanded - it wouldn't have been worth removing it all or replacing it! Thanks for following! I can't wait to see your desk!! ~Lori
Delete