Monday

When life hands you jalapenos...

Last weekend my denial over summer's end came to a halt.  It was going to freeze and therefore my garden's growing season was officially over.  The kids and I planted several things, but the truth is I do NOT have a green thumb.  The tomatoes looked frightening and the onions were pathetic.  However, the cilantro was epic and I still have a grinder with the coriander seeds sitting on my spice shelf that tastes and smells wonderful.  But my biggest successes were basil and jalepenos.


We had enough basil for the neighborhood all summer!  About once a week, I'd harvest a bunch and puree it in the food processor with garlic and olive oil.  I took this pesto 'starter' and froze it in a mini muffin pan.  The end result was several bags of these little guys.

(I think I need to take a class on how to photograph food.  It always looks so strange!)

These are so good made into pesto, bruschetta, or tossed into a soup or baked chicken!


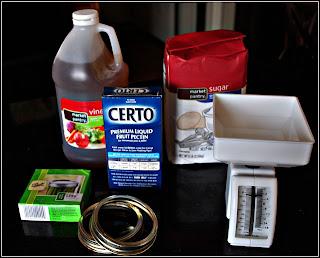
My other successful veggie, the jalapenos, became my first adventure in canning.  I made jalapeno jelly!!!
The recipe called for 6 CUPS of sugar! Crazy!


 Here are about half of the little jewels.  Some weren't even fully grown, but it was time to harvest anyway!  I was originally going use the green peppers only (for aesthetics) until I bit into one of the tiny red guys - HOT!  Hubby and I like spice, so I decided to add them.

 
Peeled, seeded and cored!


Here are the jars taking their water bath.  Notice the sticky pan behind, seriously, JELLY is sticky stuff!


There was one mishap - the bottom of one of the canning jars broke out and the contents gradually oozed everywhere.  I was unfazed and pretty pleased that the remaining jars all sealed correctly!

Sorry for this blurry pic.  I think I had jalapeno juice in my eyes - next time I'll wear gloves!


 The end result was great.  The next day we tried the jelly over cream cheese with crackers.  It's a little sweet for my taste (um, yeah, 6 cups of sugar?) but I plan on changing the recipe up a little.  I'm not going to lie, it was A LOT of work for 3 jars of jelly!!  Do you have a WINNING jalapeno jelly recipe I could try?

I linked up here:
Funky Junk's Saturday Nite Special

Thursday

The Project Heard 'Round the DIY World - Chandelier!

There are several fun do-it-yourself ideas that I've been really wanting to try, but the brass chandelier makeover is definitely at the top of the list.  I waited until I found the perfect one at ReStore for the sitting area of our master bedroom.  Here's what I chose.

Not too much detail, small enough to fit in the space and I love that sphere at the bottom - perfect!  I have to admit, it was love at first sight, which means I failed to notice the broken socket, lack of bulbs, funky wiring and missing white tubes.  (I'm sure there's a technical name for these, but I don't know it!)  Still, pretty foxy for $8, yes?

I've seen these painted every color, but I decided to go with white.  The room she's going to live in has a dark accent wall and way too much dark furniture.  I hung the light from the kids playset and in typical style, spray painted the heck out of it.

I repaired the socket with luck superglue and bought a lamp kit for $13.  It included a cord and plug, 2 hooks and a 12 ft chain.  This was perfect since I was hanging it somewhere with no existing fixture.  Once the wiring work was done, I felt like Charlie the Electrician (you know, Bob the Builder's cousin?) I was so proud!!

The next thing on the list was to make a cord/chain cover.  I love the way these look but then that whole issue of sewing (gasp!) came up again.  

So, the pretty white light sat waiting patiently, for days weeks....until I realized that this would be the perfect time to use fabric glue!!  Woo hoo!! Why didn't I think of that sooner?!?!?!  I took 2 white kitchen floursack towels and cut them into strips about 6 inches wide.  I glued them together end to end and had about 12 feet of fabric.  Then, I folded the sides together and glued, forming a seam and cut off the excess.  After it was dry, I turned the whole thing inside-out and VIOLA, a cord cover!


I'm really glad I added this to the room, such warm light!
 
Another...


Clearly the boring window treatments and popcorn ceiling could use some work!!  The bedroom update is almost complete!! 

I really want to know what you think - would you have gone with another color???


Tuesday

The Thrifty Weekend!

Okay, I'm going to jump right to the good part... The car was packed SO full (I take great pride in my packing abilities!) that I thought I might have to leave the kids at my Mom and Dad's house and come back for them later!!  (That would never really happen, by the way!)  I planned to get home, grab my camera for packing prowess evidence and then decide what project would come first.  Of course, in all my excitement, I failed to take a picture of the car full of goodies - but my husband witnessed it firsthand.  And laughed.  And rolled his eyes.  Of course.

I was so excited that I nearly forgot to take 'before' pics of some of the most fun finds!!    

We traveled to my parents' home and then out to their farm to take a break from all the thrifting.  I will say, it was a relaxing, fun trip.  AND I came home with chairs, frames, decor, mirrors, nail-head trim, sewing notions, a lantern, books, maps, globes, ornaments, paint supplies and a Cricut Cake machine!  I know you're jealous... well, you might be if you found out how little I spent on it all!!

Here are a few sneak peeks and a few pics from the farm.  Stay tuned to see it all magically transformed (the finds, not the farm)!!

Needing a little love!!


 I love her - she's so girly and swirly, and yes, $5.99.


 An overcast morning, but beautiful and serene nonetheless.


Cute sign - I couldn't agree more!


 Our new friend.


Not a cloud in the sky!  You know what they say about Kansas weather!


I was able to find some really unique frames for my gallery wall (not the best photo, sorry, they're all laid out on the floor).  Now all I have to do is recruit some help in hanging!  I'll post more when it's finished!


Thursday

My take on Subway Art - a tutorial

 In one of my last posts, I mentioned that I had several fun things I was working on and couldn't wait to share. I wasn't kidding.  I am currently somewhere between "wow, this is really going to look great in 20 minutes" and "this project is NEVER going to end", with 9 separate projects!!!  I get it - WHAT WAS I THINKING???  To tell the truth, it's completely typical of me (imagine Husband rolling eyes in agreement here)!
Part of the problem is this cold snap (hello, 33 degrees? what happened to Fall?) and therefore an unanticipated halt to all of my painting!  Another issue? I need to re-teach myself how to sew.  Um, yikes.  I'll get to that next week.....

So, here's today's finished INDOOR product!!
I love all the subway/text art out there right now.  I've been trying to find a way to make my own without shelling out a million dollars $500, or burning out my Cricut cutting vinyl letters, etc.  I stumbled upon a great tutorial at A Thoughtful Place and it was just what I was looking for!!  I'm going to try another process as well, but we'll get to that on another day.  (**update on 11/8, see bottom of post)

Hubby and I decided that our favorite vacation spots would be just the thing to put on our bedroom wall (of course we thought of 2 more after I'd already ordered the print!).

To make the art: I designed the print simply using Microsoft Word, varying the fonts and capitalization.  Make sure you change your background color to black and your font color to white (or whatever you prefer.)  Then I uploaded it to the Staples print center as an architectural drawing.  You'll have to upload it differently if you use anything other than black and white.  Also, it may help to determine the ratio of your saved document to the canvas or wood you're covering to make sure that none of your words will overlap the sides of the canvas.

  Props to the sweet ladies at the 135th St. Staples in OP, they printed and sent Hubby home with 2 of them last night because the first one had a few flaws!  Little did they know, I was going to give it a few more!! 

So, that meant I'd either have 2 identical prints or 2 chances to get one of them right!


I painted the sides of a 2' x 3' canvas black for a more finished look.  Then I Mod Podge'd the print onto it.  It helps to start on one edge, paint the Mod Podge on and just lay the print down a few inches at a time.  Don't worry about the wrinkles, most of them will smooth themselves out and any that are left just add character.  Once the print is done, go over the top with another layer.

Then when it was dry I coffee stained and glazed with both a black and a brown glaze and sanded it using the Dremel Drill I got for my birthday (dances a little jig here!).


This is the end result - on my first try!  I couldn't be happier!


I should also mention that because I already had everything but the print itself on hand, the whole project cost me $3.15!  Love!

Here's a close up showing a little more detail, the large photo doesn't quite do it justice.


Sometimes the least expensive art is the best, wouldn't you agree?


**11/8/11 Update:  I had a heavy piece of wood that was the perfect size for a narrow wall in our great room and I wanted to see if the outcome would be similar using the wood vs. the canvas (above).  I was able to add a few cities as the wood was longer, but the process was pretty much the same.  I actually did less distressing this time, but sanded the edges with a palm sander so that the wood would show thru.  I love the result (again).  I truly think this is the easiest and least time-consuming way to make Subway Art!!


Pin It
I linked my art here:

Sunday

Halloween Mantel

I know I'm a bit behind with this post, but I've changed this mantel 3 times!!  The kids and I had fun doing it though!!!  I'm trying to get better with differing heights and textures!  My "googly-eyed" busts were inspired by these from Design DNA - awesome idea!! I made my own "poison" skull and crossbones wine labels and got a little creative with some $1 store skulls and old glassware. 
Is it spoooooky enough?


I linked this mantel here:
Photobucket Home Stories A2Z

Thursday

School Project and Lamp Updates

Last night my 2nd Grader and I completed a school project using "arrays".  The assignment was to find arrays in our home and report on them.  I took the pictures for him; the one below is my favorite.  (unedited, sorry)


Gotta love those little Lego guys!

Remember my cute lamp makeover?  I decided to Mod Podge some scrapbook paper onto the shade rather than buy a new one.  I think it looks great, but I'd definitely do it differently next time!  I love the idea of changing it out, so I may use Shelley's tutorial at House of Smiths for a less permanent solution!  I love so many of the ideas in her blog, check it out!!


Another update:  I found 5 matching shades for my chandelier at ReStore but needed 6.  There was a 6th one there but it was white and had a slightly different texture.  I brought all of them home and brewed up some coffee to dye the white one to match.


How'd I do?
Can you guess which one was white?

Sunday

Monogrammed Planters Ready for Fall

I love fall - who doesn't, right?  
After surviving 7 birthday parties including my own, my husband's and a sleepover with 10 boys ages 8 and under, a whirlwind business trip and other craziness, I feel like it's time to get back to doing the things that FULFILL and REPLENISH ME!!!  I have to admit that I'm glad I've finally learned what does that!

So, I'm working on some really great projects (about 8 at a time - typical) and I'll be posting those soon!!

For now, another simple past project (sorry, no before pics) and some beautiful fall mums, courtesy of my sweet neighbor Kim!

These planters were faded, cracking and dull.  I painted them a matte black and added the tan vinyl L.  I LOVE monograms and my initials are LLL, so you're bound to see plenty of L's along the way!

Also, I have to take the time to send a LOUD shout out to Donna at Funky Junk Interiors!!!  Without her, my blog would be hideous, my buttons misaligned, and my signature nonexistent!!  Thank you, thank you!  Also, everything on her blog is cool - go check it out!!

I linked up these fun repainted and monogrammed planters to:
Funky Junk's Sat Nite Special

LinkWithin

Related Posts Plugin for WordPress, Blogger...